My Proposed High Round Strategy for John Banana's
Nacht Der Untoten in Full Co-Op Lobbies.
Figure No.1 | Starting Room & Mystery Box Basement | Players 1 & 4
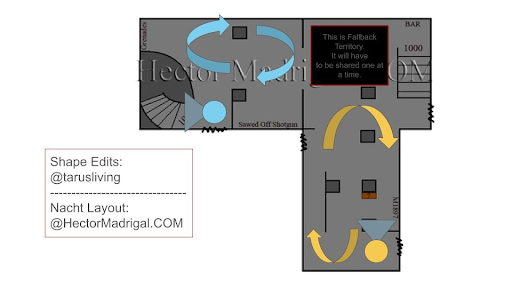
Figure No.2 | Upstairs Balconies | Players 2 & 3
Legend:
White = 1st Player's line of sight and their training rotation.
Blue = 2nd Player's line of sight and their training rotation.
Orange = 3rd Player’s line of sight and their training rotation.
Green = 4th Player’s line of sight and their training rotation.
Notes:
So, it's a little hard to see in the figures that I've edited, but the 1st player needs to stand next to the first barrier that everyone sees when the game starts and run around the columns with the weapons that suit your play-style. The game begins to get challenging when you avoid the
HELP door by taking the stairs up from the starting room and then head down to the
Mystery Box room from the second floor. This door should completely separate the group in two by using the floors and rooms as funnels. The 1st and
2nd players will hold one half of the bunker on each floor, and so will the
3rd and
4th players. Each player will reduce the amount of zombies that enter the bunker, starting from the starting room, then up the lobby room stairs, through the balconies, and then down the stairs into the basement, shown in the figures above.
It's possible for the
2nd and
3rd players to defend the upstairs and train around their balcony by themselves. They need to be skilled enough to train within tight corners and should not get stuck against any of the columns, which is really difficult to do consecutively. This applies to the 1st and
4th players as well which should hold down their designated barriers and line of sights. Each room and floor will possess its own challenges and will reap its own rewards. Power-ups and wall weapons are fair game. A good rule of thumb to have before a game starts would be to mention how everyone should avoid falling back into the
3rd player's training rotation. This area will be located on the second floor near the
Trench Gun wall-buy so try to reduce the flow of activity on the second floor as much as possible. There is another
fallback territory=#c0392b
, located between the
B.A.R. wall-buy and the stairs leading down to the
Mystery Box room. This can become a choke-point as soon as you move the couch so it's not great to get down here.
Pro-Tips: Watch the stairs and shoot the barriers from a far. Try to save mortars, flares, and satchel charges by using them sparingly. Take breaks.
Overall, everyone needs to stay in their designated sections for as long as possible. You should save a crawler when you have a chance. Crawlers will give everyone enough time to hit the box by the end of a high round. There will also be territories that are long enough for farming power-ups, located on the first floor by the
M1 Carbine wall-buy and the entirety of the
Mystery Box room. These territories will have to be negotiated over chat, whenever possible. Everyone can rotate training rotations, so the 1st player can train around the
4th player's area if the game becomes so exhausting. Finally, the help door needs to be kept closed on the first floor, and
SHOULD NOT be opened at all unless everyone but you are down for the count. This door is kind of a last resort to save the game, or just for the host of the lobby to continue the game. This strategy was implemented by myself, and a couple of friends, so it is possible for a full lobby to perform if well-coordinated and can be performed as low as a trio group. I would refer to
John_Banana's previous stream provided below for a visual example. It sort of happened. I've seen the strategy lead up to the early twenties from what I've witnessed in the most recent live-stream.


 Reply
Reply

 2
2 1
1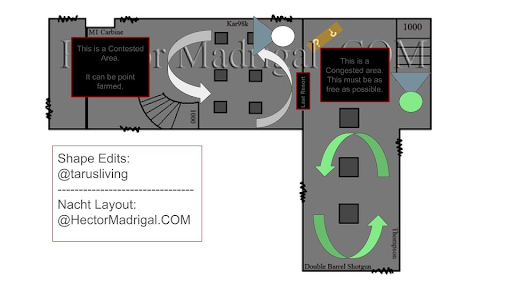
 2
2